Beancount Scripting & Plugins
Martin Blais, July 2014
http://furius.ca/beancount/doc/scripting
Introduction
This document provides examples and guidelines on how to write scripts that use the contents of your ledger. It also provides information on how to write your own “plugins,” which are just Python functions that you can configure to transform your transactions or synthesize ones programmatically. These are the main two methods for extending Beancount’s features and for writing your own custom reports. You simply use Python to do this.
Load Pipeline
You need to know a little bit about how Beancount processes its input files. Internally, the single point of entry to load an input file is the beancount.loader.load_file() function, which accepts an input file and carries out a list of transformation steps, as in this diagram:
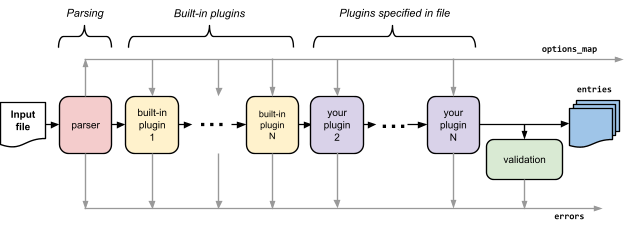
The stages of loading are as follows:
-
Parser. Run the input file through the parser. The output of this stage is
-
entries: A list of tuples (defined in beancount.core.data) corresponding to each directive exactly as it appeared in the file, and sorted by date and line number. Moreover, Transaction directives that occur on the same date as other directives are always guaranteed to be sorted after them. This prepares the entries for processing. This list of entries will get transformed and refined by the various subsequent stages.
-
options_map: A Python dict of the option values from the input file. See beancount.parser.options for details. Once created, this will never be modified thereafter.
-
errors: A list of error objects, if any occurred. At every stage, new errors generated are collected.
-
-
Process plugins. For each plugin, load the plugin module and call its functions with the list of entries and the options_map from the previous stage, replacing the current list by the ones returned by the plugin. This effectively allows the plugin to filter the entries.
The list of plugins to run is composed of a set of default plugin modules that implement some of the built-in features of Beancount, followed by the list provided by the user from the “plugin” options in the input file. -
Validation. Run the resulting entries through a validation stage, to ensure that directives synthesized or modified by the plugins conform to some invariants that the codebase depends on. This mainly exists to generate errors.
The list of entries generated by this pipeline are of the various types defined in beancount.core.data, and in a typical input file, most of them will be of type Transaction. Beancount’s own filtering and reporting programs directly process those, and so can you too. These entries are dumb read-only objects (Python namedtuples) and have no methods that modify their contents explicitly. All processing within Beancount is performed functional-style by processing lists of entries that are assumed immutable1.
The list of user plugins to run is part of the load stage because that allows programs that monitor the file for changes to reload it and reapply the same list of plugins. It also allows the author of the input file to selectively enable various optional features that way.
Writing Plug-ins
As you saw in the previous section, loading a Beancount file essentially produces a list of directives. Many syntax extensions can be carried out by transforming the list of directives into a new list in the plug-ins processing stage. Here are some examples of transformations that you might want to carry out on some of the directives:
-
Add some postings automatically
-
Link some transactions with a common tag
-
Synthesize new transactions
-
Remove or replace some sets of transactions
-
Modify the various fields
There is no limit to what you can do, as long as the entries your plugin produces fulfill certain constraints (all postings balance, all data types are as expected).
A plugin is added to the input file via the option syntax, for example, like this:
plugin "accounting.wash_sales"
With this directive, the loader will attempt to import the accounting.wash_sales Python module (the code must be Python-3.3 or above), look for a special __plugins__ attribute which should be a sequence of functions to run, and then run those functions.
For running the plugins, see the Executing Plugins section below.
As an example, you would place code like this in a “accounting/wash_sales.py” file:
__plugins__ = ['wash_sales']

def wash_sales(entries, options_map):
    errors = []
    for entry in entries:
        print(type(entry))
    return entries, errors
This is a minimal example which does not modify the entries and prints them on the console. In practice, to do something useful, you would modify some of the entries in the list and output them.
You then invoke the usual tools provided by Beancount on your input file. The various filters and reports will then operate on the list of entries output by your plugin. Refer to the source code in beancount.core for details and examples of how to manipulate entries.
Plugin Configuration
Some plugins will require configuration. In order to provide a plugin some data specific to your file, you can provide a configuration string:
plugin "accounting.wash_sales" "days=31"
The plugin function will then receive an extra parameter, the configuration string. It is up to the plugin itself to define how it gets interpreted.
Writing Scripts
If you need to produce some custom analysis or visualization that cannot be achieved using the built-in filtering and reporting capabilities, you can just write a script that loads the directives explicitly. This gives you control over the flow of the program and you can do anything you want.
Loading from File
You can simply call the beancount.loader.load_file() loader function yourself. Here is an example minimal script:
#!/usr/bin/env python3
from beancount import loader

filename = "/path/to/my/input.beancount"
entries, errors, options = loader.load_file(filename)
…
At this point you can process the entries as you like, print them out, generate HTML, call out to Python libraries, etc. (I recommend that you use best programming practices and use docstrings on your script and a main function; the script above is meant to be minimal). Once again, refer to the source code in beancount.core for details and examples of how to manipulate entries.
Loading from String
You can also parse a string directly. Use beancount.loader.load_string():
#!/usr/bin/env python3
from beancount import loader

entries, errors, options = loader.load_string("""

   2014-02-02 open Assets:TestAccount   USD
   …

""")
The stdlib textwrap.dedent function comes in handy if you want to indent the Beancount directives and have it automatically remove indentation. For a source of many examples, see the various tests in the Beancount source code.
Printing Errors
By default, the loader will not print any errors upon loading; we prefer loading not to have any side-effect by default. You can provide an optional argument to print errors, which is the function to call to write error strings:
#!/usr/bin/env python3
import sys
from beancount import loader

filename = "/path/to/my/input.beancount"
entries, errors, options = loader.load_file(filename,
                                            log_errors=sys.stderr)
…
Or if you prefer to do it yourself explicitly, you can call the beancount.parser.printer.print_errors() helper function:
#!/usr/bin/env python3
from beancount import loader
from beancount.parser import printer

filename = "/path/to/my/input.beancount"
entries, errors, options = loader.load_file(filename)
printer.print_errors(errors)
…
Printing Entries & Round-Tripping
Printing namedtuple entries directly will output some readable though relatively poorly formatted output. It’s best to use the beancount.parser.printer.print_entry() utility function to print out an entry in a readable way:
#!/usr/bin/env python3
from beancount import loader
from beancount.parser import printer

filename = "/path/to/my/input.beancount"
entries, errors, options = loader.load_file(filename)
for entry in entries:
    printer.print_entry(entry)
In particular, Beancount offers the guarantee that the output of the printer should always be parseable and should result in the same data structure when read back in. (It should be considered a bug if that is not the case.)
See the beancount.parser.printer module source code for more utility functions.
Executing Plugins
All that is required for the plug-in module to be found, is that it must be present in your PYTHONPATH environment variable (you need to make sure that the relevant __init__.py files exist for import). It can live in your own code: you don’t have to modify Beancount itself.
There is also an option, which can be added to your beancount file:
option "insert_pythonpath" "True"
This will add the folder which contains the beancount file to the PYTHONPATH. The result is that you can place the plugins along the beancount file and have them execute when you use this file.
Here is a brief example, using the wash_sales.py plugin we wrote above. Your beancount file would include the following lines:
option "insert_pythonpath" "True"

plugin "wash_sales"
The Python file wash_sales.py would be stored in the same folder as the .beancount file.
Going Further
To understand how to manipulate entries, you should refer to the source code, and probably learn more about the following modules:
Refer to the Design Doc for more details. Enjoy!
-
Technically, Python does not prevent the modifications of namedtuple attributes that are themselves mutable such as lists and sets, but in practice, by convention, once an entry is created we never modify it in any way. Avoiding side-effects and using a functional style provides benefits in any language. ↩